NIMBY Rails devblog 2026-03
New train motion integration loop
Simulation games use the concept of “time slice” to advance the time of a simulation. At the start of processing a new simulation frame, a clock is simulated which advances a certain amount of time, and the various simulation systems also change the state of the simulation based on the elapsed time for the given frame, starting from the current state and using the elapsed time as the input (and also player input).
There’s a variety of approaches to pick the elapsed time for a frame. A direct but very problematic way is to use a real time clock, and just advance the simulation based on it. This means that if the past frame (plus rendering plus many other things, depending on the architecture of the game) took a specific amount of time, that amount of time is now how long the simulation clock advances. Want a simulation speed control beyond 1:1 real time? Multiply it with a factor. This is problematic idea mainly for 2 reasons: depending on the factor and how long it takes to process a frame, the simulation logic now needs to handle slices from 0.01s all the way to 1s or even more if you allow very large factors. And the second reason is that physics simulations which approximate integration using discrete steps break down very fast when said steps have a varying time slice.
The “correct” approach is to fix the time slice to a constant value. For example, a simulation frame will always process exactly 0.01s of time, never more and never less. Did the real time clock go slower than this? Then maybe 2 frames will be processed instead of 1. Did it go faster? Some frames won’t produce any new simulation data. The rendering layer is then responsible to use interpolation and frame pacing to smooth out any possible artifacts from this. This is how virtually all properly coded real time games work, be it sims, shooters, you name it. If you run a simulation of any kind, please fix your timestep.
In this system, to implement “speed controls” for sim-like games (like Nimby), you have a few options. One is to just don’t do anything. Speed 10x means you will ask the simulation layer to simulate ten 0.01s frames per 0.01s of real time. This works as long as the simulation is fast enough and/or the simulated world is empty enough. This produces perfect results at every simulated speed. Of course it also means the simulation won’t be able to catch up to the requested speed at some point, and quite early too.
Nimby allows building up to massive scales. The only limit is meant to be the user CPU and RAM. Having a fixed timeslice won’t work, but it’s also vital to guarantee simulation stability. So it uses an hybrid approach: there’s actually 3 possible timeslices, each 10x longer than the last one, allowing the sim code to “10x step over” compared to the previous shorter one. These correspond to the 1x, 10x and 100x speed levels. After 100x, the sim runs in the “more sim frames per real time clock” mode I described earlier.
This is still a variable timestep (bad) but the possible values are bound and known in advance (less bad), so the simulation code can adapt itself to this variable time slice. Things like train timers are immune to the problems of variable timeslice, and others like pax boarding flow are not critical for a perfect simulation so they can accept some imprecision. But there’s a area that’s very sensitive, as I hinted earlier: physics simulation.
As limited as the physics simulation in the game is, it’s still driving the trains and setting the speeds and moving them along. The main bad symptom of variable timeslice is the train behaving differently between sim speed settings. This was a problematic in the past but it got a lot better after I implemented some formulas approximating the exact integration of the train motion over any amount of time, but only based on an initial and final acceleration value. This is incorrect (acceleration depends on speed which depends on acceleration with depends on speed… you get the idea) but it was more or less okay, it produced decent results. But in 1.18 even this simple system had to be removed, because in 1.18 speed changes have become unpredictable. Any signal can enforce any speed if it’s in range of a train.
So it was time to finally implement an idea I had a long time ago: a specific fixed timestep for the train motion physics simulation, which is always the shortest possible timestep (I picked 0.01s). And then a sim frame timestep which is always an integer multiple of this fixed timestep. The simulation still accepts a bounded range of timesteps, but when it needs to advance the train motion simulation, it slices it down into these shorter steps, and simulates each one individually. This has the immediate result of massively simplifying the maths to just products and additions, since there’s no more attempt at integration, just the straightforward application of middle school motion physics. Despite this, it is more precise, since each frame is using the previous frame as input, meaning that the acceleration curve is correctly calculated based on “current” speed, rather than being an approximation over a longer time slice. And it will be the exact same at all game speeds. If you are at 100x speed, the game is iterating the train motion sim 100 times per train per frame!
This would normally nuke simulation performance, to the point speeds above 10x would be challenging for many PCs on just medium saves. So I isolated the motion loop into this new system, and run everything else in the train logic at the slower frame step rate. This is less correct simulation wise but it still preserves the timing of motion given no other interaction, like in line timing. It still has a small performance impact, but it is worth it. The game finally has a decent motion simulation loop.
Now some bad news: this means all line timing has changed again in 1.19. In my experiments virtually all scheduling errors when loading 1.18 and earlier saves were due trains braking slower under the new, more correct loop. It was not just a few legs or runs, it was massive errors in timetabled saves, like more than 50% invalid runs. To salvage this (both my effort and yours) I am introducing a global brake factor in the 1.19 Company options. 1.18 and earlier games are automatically set to 1.5, which immediately fixed all the errors I tested. It’s also an interesting tunable for “realism”, setting it to for example 0.3 gave trains a much more sedate behavior when braking and made things like not being able to reach max speed in some shorter legs a more relevant situation.
Linux port
I’ve continuously used Linux to some capacity for the past 30 years, since the time I was in high school and was reading the kernel source and making my own compilations. Its relevance to my day to day came and went with the times, sometimes just the OS in some server somewhere, sometimes as my main desktop.
Becoming a game developer, I decided I had to use Windows as my main desktop. I also decided to trust it as little as possible, with the only valuable thing in the Windows PC being the game source code. Everything else I do it’s on a separate Linux PC. Still, the Windows PC was the main machine on my desk, where I did most browsing and work, and ended up logging into Linux remotely or with input sharing.
It’s amply documented how Microsoft has been degrading Windows over the years. I was more immune to this than many people I believe, but it reached a point it was too much even for me. Forced chatbot integration everywhere (Notepad?!) and removing local account creation was the last straw. But it was also the sense how much the concept of general purpose computing is being removed from availability for the general public. Everything is on fast forward to become a locked down appliance managed remotely by some megacorp somewhere. You’ll own nothing and you’ll be happy about it.
It was too much so I decided to go full time Linux (NixOS if you need to know; what other distro could the guy who designs and implements its own programming language for a train videogame possibly pick?). This means I will only boot the Windows PC when I need build and test the game (and the Windows build part can also be moved to Linux with some effort). But this would be unworkable for a Windows game… unless the Windows game also becomes a Linux game. NIMBY Rails has been ported to Linux. 1.19 will have a native Linux build and it will be a first tier platform, along with Windows. All builds will be provided for both OS. If you are also fed up with Windows and this helps you to decide to try Linux, I will consider it a huge win.
The port was a lot less dramatic that I expected, thanks to quite portable choices I made when picking the support libraries and frameworks years ago. It’s a Vulkan-only app, using SDL3 (Windows is now also using SDL3, hopefully helping with the input bug lockup situation), and should work fine both under X11 and Wayland with a single binary. It targets the Steam Runtime v3. I mention this because the binary-only situation for apps in Linux is a complete shitshow, so fortunately Valve provides this runtime container system, and it should be smooth for all users (Proton is another user of this system, and apparently the Steam Client will also become one in the future).
To preempt the inevitable question: there won’t be a Mac port of NIMBY Rails. Everything bad about Windows and Microsoft applies equally as bad or worse to macOS and Apple (my stance is also political, not just technical), except their market share is much smaller, so there is no reason to port the game to the Mac.
Map (r)evolution
The game map is being updated in 1.19, but it is no mere refresh with the latest OpenStreetMap data, it is much, much more than that. I decided to drop my proprietary file formats and instead adopt industry standard formats and tools. The goal is for the game map file to be possible to be generated by anybody, using only open source and free tools, without any programming required, and at a reasonable cost. To temper expectations, NIMBY Rails is a videogame, not a GIS suite. The goal of 1.19 is to adopt a limited set of industry formats for the limited goal of having an in-game geographical map, not to develop a copy of ArcGIS that happens to have some moving trains on it.
When researching the field of open source GIS for 1.19, I noticed that in the past six years the landscape of open source tools for working with OSM data at the planet-wide scale has improved a lot. In particular planetiler caught my eye: a very simple to use map tile generator, which starts from the original OSM data source and finishes with a directory or container of ready-to-render vector tiles, all in a single step, with no programming or scripting required (if you stick to the default tile schema). But most importantly it does so with very good multicore scaling and a very constrained memory usage. I’ve been able to generate world tile maps in under 90 minutes using a 48 cores / 192GB RAM instance. This is less than 2 euros in hetzner.com, for example.
The container file is just a single-file way of packaging a directory of tiles. Servers often keep their map tiles in a directory, without any packaging, but for an offline application this is a waste of filesystem resources, since each file has an overhead. After finding planetiler I decided to work backwards from it. To replace my proprietary tile container format (the “NRMap” files), I explored the available options in planetiler: Mapbox MBTiles and Protomaps PMTiles. MBTiles are just a SQLite database of tiles, while PMTiles are a special purpose container optimized for speed and size. I decided to go with PMTiles, since it’s the closest match of what I accomplished with NRMap.
For the vector tiles, there’s two options in planetiler: Mapbox MVT and the very new Maplibre MLT format. Again the same situation: the incumbent format from the commercial company and the up and coming open source alternative, a more optimized option. Again I went with the second option, so the game now expects vector tile data to be in MLT format. It will be one of the first users of this format, outside of Maplibre own renderers and tools. To ensure I remain compatible I am not implementing my own MLT loader. Instead I will use the one provided by Maplibre, which is fortunately separate from their huge, very capable but also very complex maplibre-native renderer project.
This means the game map renderer is still the same. The lower layers that deal with loading data have been replaced with PMTiles and MLT loader code, which then translate the MLT vector data into the internal vector tile representation already used by the game. This has allowed me to bring up this idea quite fast, and the game is now rendering MLT tiles read from a PMTiles container, with zero of my original formats and data involved:
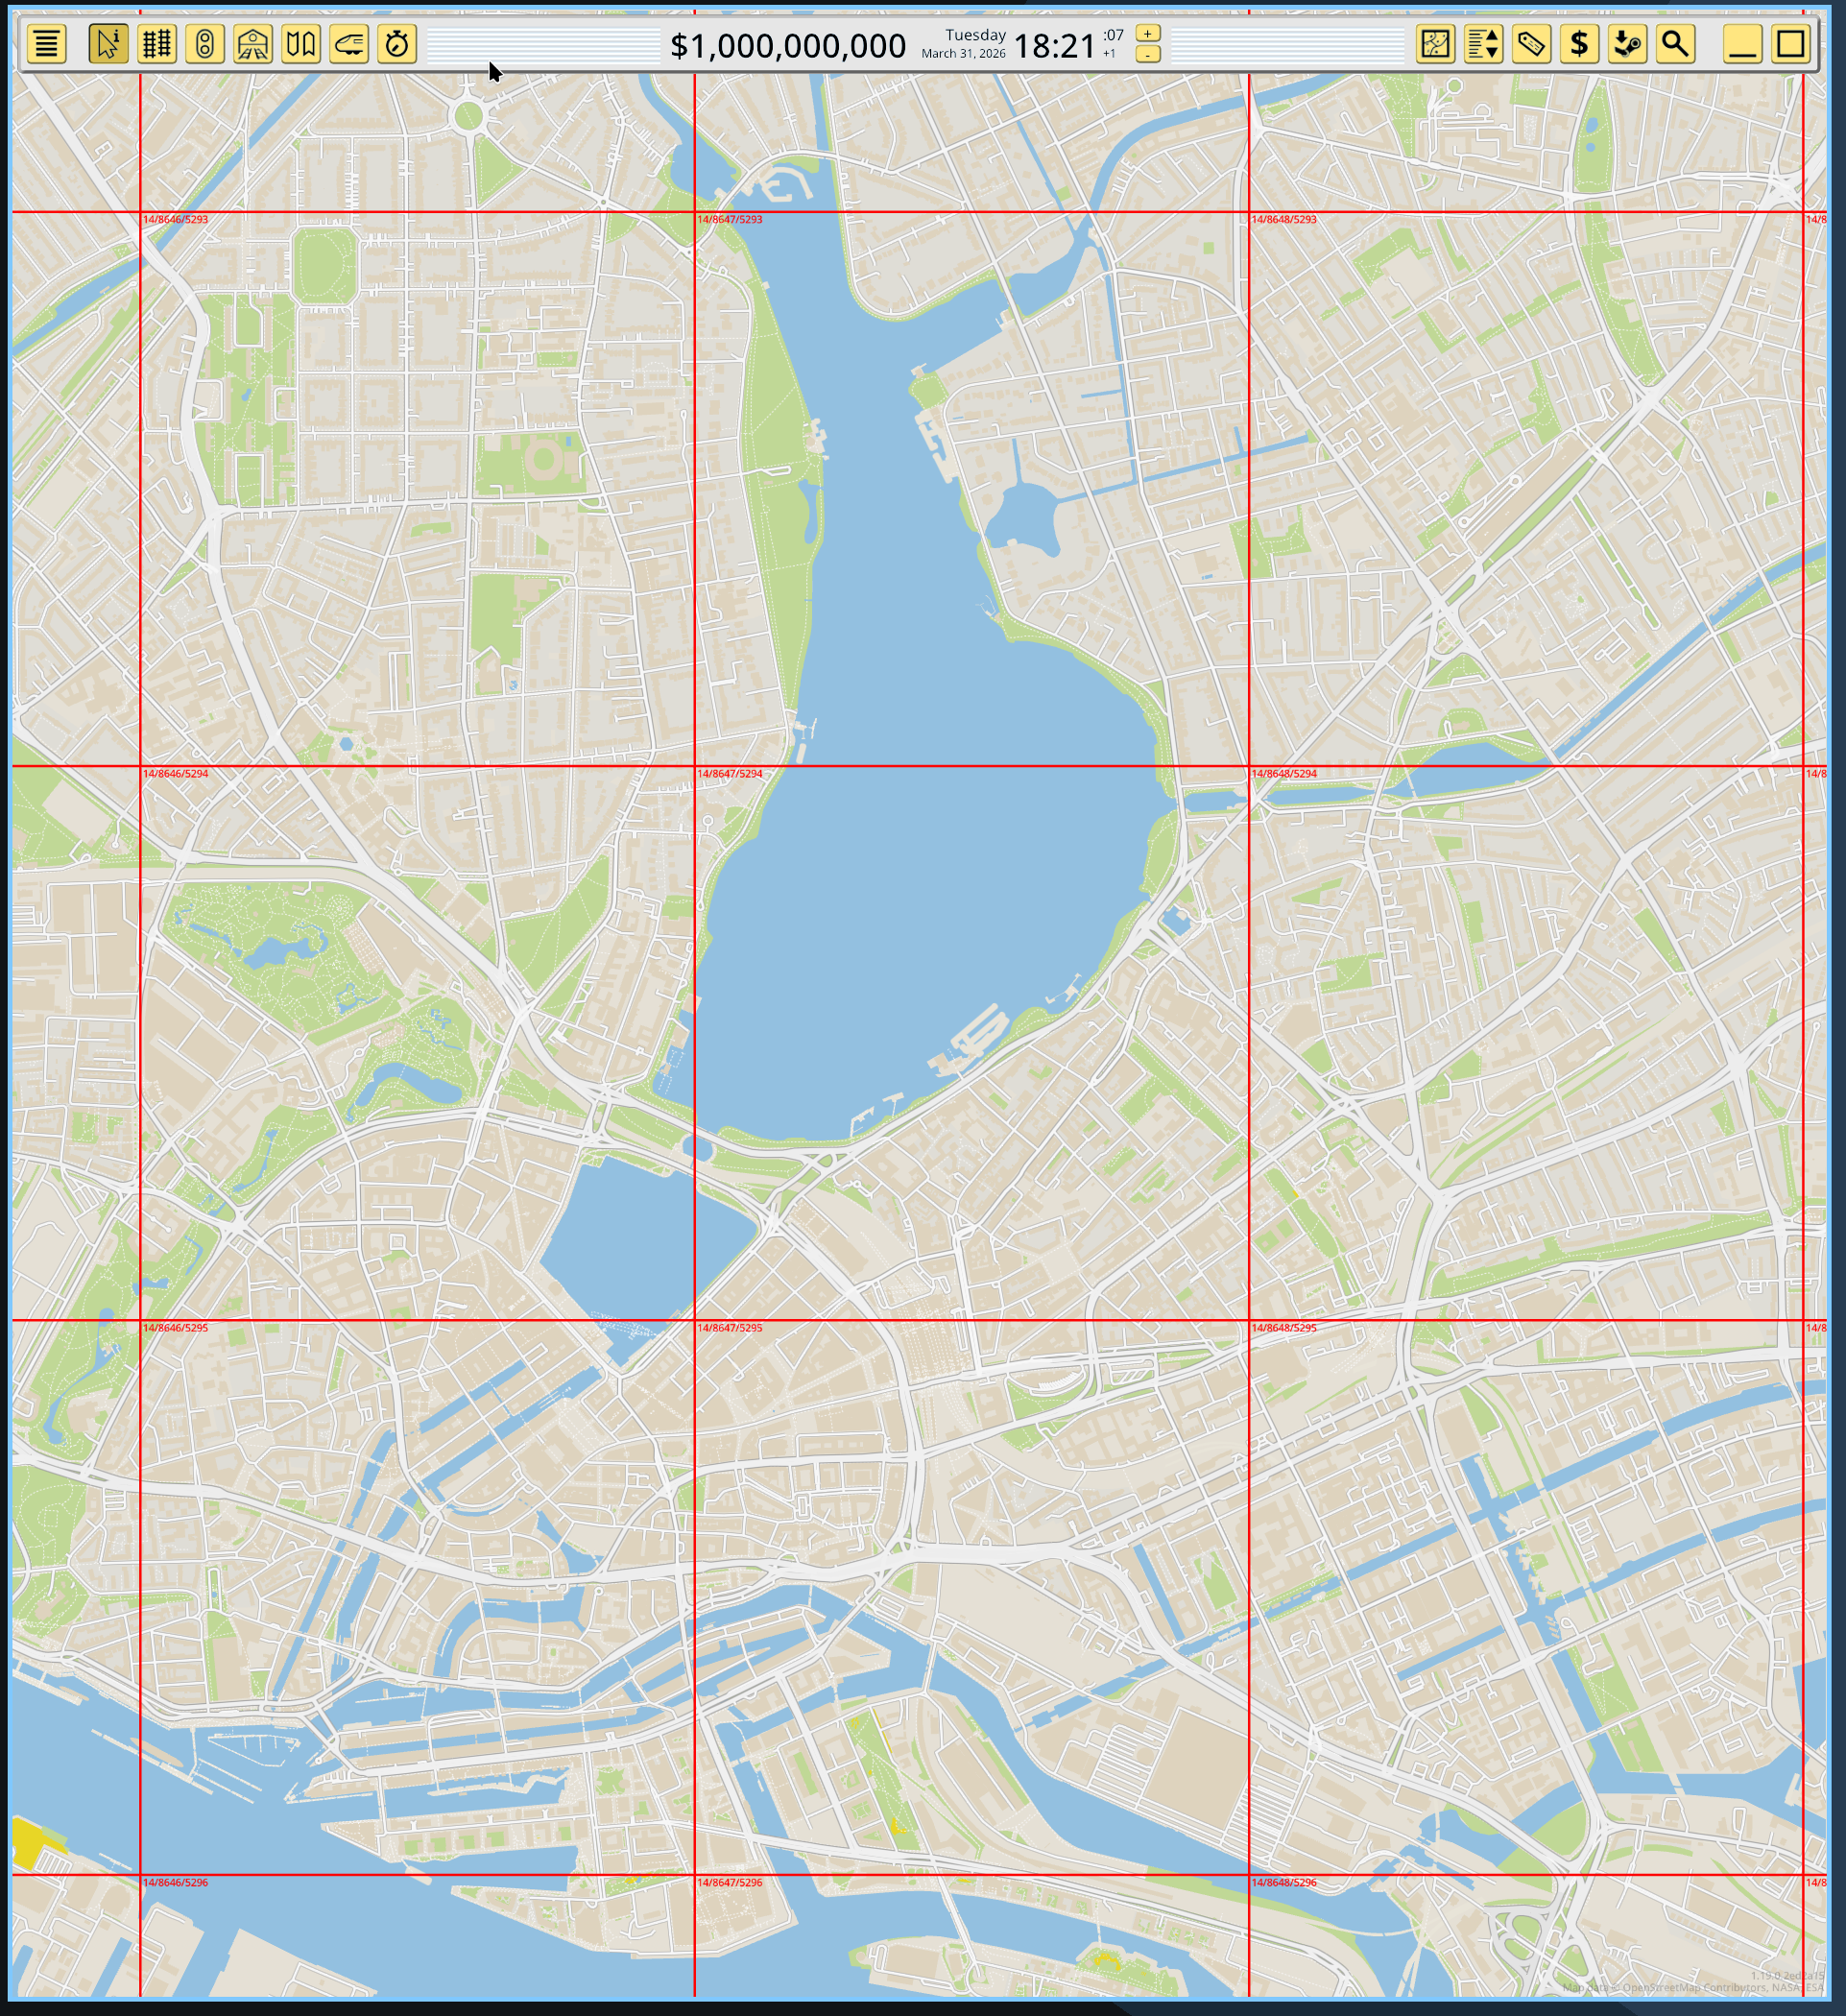
This also means the old concepts in the game for tile coordinates, sizes and zoom have been replaced with the industry standard ones used in the OpenStreetMap ecosystem. Tile coordinates and zoom level now match these of commercial maps, to the point you can just lookup the numbers in a web map and find the same tile. I’ve picked zoom level 14 as the “gameplay” zoom level for the game, which also matches the default maximum zoom level in planetiler, and also includes the full detail in the default tile schema.
Better and more data also means more bytes
As always, a map update implies newer data from OpenStreetMap, which in turn also means more data. And observant readers might notice something in the previous screenshot: buildings. It’s my intention to not exclude buildings in the 1.19 map update, although planetiler makes it quite easy if desired. And finally, the default tile schema in planetiler makes different, higher quality choices when it comes to which data to preserve from the OSM database, compared to the choices I made in my last propietary conversion tool. The combination of these factors mean that the game map data size will increase, by a lot. At the moment the vector file is 43GB, compared to the 20GB of 1.18. Mind you, this is already a triumph of optimization, because I’m deploying all the tricks I can without actually starting to code myself a tile schema for planetiler. I’m removing huge data layers that have zero relevance to gameplay (who wants a 2GB+ POI layer with every street door number in OSM?), and less obvious things like dropping the entirety of zoom level 13 for a massive 20GB size reduction (zoom 12 is kept and automatically “fills in” when 13 is required by the map renderer).
I’m not sure how this will be received. I’m specially sorry about doing this given the state of the PC components market and SSD prices. I hope the very noticeable quality and detail gains are appreciated. If it’s too much for too many, there’s still margin to bring size down in exchange for major quality and content cuts. For example by dropping buildings and declaring zoom 13 the gameplay zoom, and dropping zoom 14, I could bring the file size down to around 22GB, just a bit over the 1.18 NRMap file, for a quality and content similar to 1.18.
On the other extreme of the equation, players with Strong Opinions about map content and update cadence can now make their own map which includes everything in a 70GB file. I won’t do this myself, but as I explained earlier, this can be done for just 2 euros on a rented VM server.
New style system
I keep mentioning “tile schema” in this post, so it’s time to explain what it means. The OSM tile ecosystem does not directly use the OSM tag data at the rendering level, like it is (was) done in the game. Instead something called “tile schemas” are defined, which translate from the OSM data into a new data schema, with different naming and values. This is done when the tiles are generated, so the end result does not contain the original OSM data, it only contains whatever the schema code deemed necessary. This rewritten data is often renamed and simplified compared to the OSM source.
There’s many of these “tile schemas”. The most popular one, and the one bundled with planetiler, is OpenMapTiles. It looks and feels a lot like the most popular tags in OSM but it’s also not the same. It also has an explicit concept of “layers”, but these are more like data grouping than for rendering.
The resulting tiles, which are encoded to a specific schema, are then expected to be renderer using a stylesheet file which is also coded for the same schema. In the OSM ecosystem the de-facto tile format is the mapbox JSON Style Spec, which is a very, let’s say, organically grown listing of whatever features the mapbox map renderer has gained over the years (Maplibre has its own fork).
I made an attempt at supporting this JSON style system and very quickly rejected it. It has some very extreme aspects, like an entire mini programming language based on Lisp but expressed as JSON arrays, which is quite something to behold. I also looked into using the Maplibre code for this, but unlike the MLT loader, the JSON style system is deeply tied to the renderer (another bad smell for this spec) so I also discarded this.
In the end I decided to keep the existing style system, with additions. If it’s not clear by now, none of the existing map style mods will work in 1.19. Again I’m sorry, and I hope what is gained in return is appreciated. To make the existing system compatible with the new maps very little was needed. The concept of “source layer” has been introduced:
[StyleMesh]
source_layer = landcover
and subclass = ice_shelf
color = hsl(47, 26%, 88%)
opacity = 0.8
This source_layer attribute matches the layer listing in the previous schema documents. The and/or attributes remain the same, they just match the attributes listed for each layer in the documents. And I will also add some extras to make it easier to translate existing JSON styles, for example by supporting (some) CSS-like color syntax. Since the map renderer is still the same, the available attributes for rendering options remain the same.
A very important change is that I’m adopting the same semantics used in JSON styles for the ordering of graphical shapes. In the JSON stylesheets shapes are rendered in the same order their respective styles are listed in the JSON. The mod.txt style blocks will work the same. For example, if you define a StyleLine for tunnels first, and later a StyleLine for roads, the tunnels will always be rendered first, then the roads on top. The order of drawing is implicit on the order of style rules in the mod.txt, it is not defined by the schema source layers.
The bundled vector map files in 1.19 will follow the OpenMapTiles schema, but I don’t want to hardcode the OpenMapTiles schema in any way. This means that it should be possible to generate tiles using a different schema (for example, Shortbread), and provide a mod.txt stylesheet which expects that schema, and have the game be able to render the map. But not just render, also be able to play on it, including all the map-related gameplay features. At the moment these features expect certain hardcoded OSM tags, which won’t exist in 1.19. Instead of hardcoding tags these features are now driven with mod.txt attributes. For example there’s now attributes for flagging matched styles as a track collider:
[StyleLine]
source_layer = transportation
and class = primary
pass1_half_stroke_phys_mm = 4500
pass1_half_stroke_px_dec = 0
pass1_color = #999999ff
pass2_half_stroke_phys_mm = 3500
pass2_color = #edededff
gameplay_collider = road
Track map layering is now also driven from the mod.txt styles, by integrating a new GameplayTracks style block in the middle of the existing StyleLine/StyleMesh styles:
[StyleLine]
source_layer = waterway
and brunnel = tunnel
...

[GameplayTracks]
depth = -3

[GameplayTracks]
depth = -2

[GameplayTracks]
depth = -1

[StyleLine]
source_layer = transportation
and brunnel = tunnel
...

[StyleLine]
source_layer = transportation
and class = motorway
...

# more ground roads here

[GameplayTracks]
depth = 0

[StyleLine]
source_layer = transportation
and brunnel = bridge
...

[GameplayTracks]
depth = 1

[GameplayTracks]
depth = 2

[GameplayTracks]
depth = 3
The in-game options to override this map-track layering will remain available in 1.19.
Another major area I have yet to even start to look into is map labels, regions and their required visual clustering. I want to expose a new set of style blocks and attributes to style point-like features and their labels.
Raster is a work in progress
After bringup of a minimal but effective loader for vector tiles in this new system, I also took a look at replacing the raster tiles, and it turns out to be much more complex than I expected. The cosmetic layers are not a problem, although I’m again a bit worried about compression and a increase in size. Fortunately being just cosmetic and a bit oversized already since the last map update, they could tolerate some resizing.
But the population layer is much harder since I am doing some unique data manipulation I don’t see documented as available in any third party tool (for example, 1-bit coding for the buildup layer with a custom threshold, with max() sampling for the lower detail zoom levels). It’s looking very likely at the moment I will need to keep using my own tools for the population layer. In any case, I still want to modernize this data processing so at least it generates PMTiles files with an OSM tile grid (PMTiles can also contain raster tiles).
There’s still a huge amount of work left for 1.19 but the basic concept of replacing vector NRMaps with MLT/PMTiles has been proven to work quite well and it will open up the game in new, interesting ways.